A perfectly prepped tooth can still turn into a long week if the dental lab prescription is vague, incomplete, or contradicts the scans. Every hour your team spends answering lab emails, shipping back-and-forth, or reappointing patients costs more than a few minutes of clarity on the dental lab Rx form. This article is a practical “show-and-tell”: real-world Do / Don’t examples that make cases move faster—covering crown & bridge, implants, and removables—plus a one-page checklist you can print for the op.
Associated Dental Lab makes it easy to send cases: you can download a lab slip, request local pickup or prepaid shipping, and everything is fabricated in their Los Angeles facility under full QC—so a clean Rx translates quickly into a clean result. Associated Dental Lab Their site also summarizes core service categories (fixed, removables, implants), so your “ask” can map to known offerings without guesswork.
Why the Dental Lab Prescription Matters More Than You Think
What the lab sees (and why it slows down)
- Conflicting instructions: Rx says “monolithic zirconia A2,” photos show A1 tab, and the provisional is B1.
- Missing materials: PVS comes without bite; scan has no opposing.
- Ambiguous shade zones: “Match #8” with no photograph, no stump shade, no characterization notes.
- Implant info gaps: No platform, no system, no scan-body library, no torque history.
- Removable guesswork: “Add a clasp” with no path of insertion, no undercut map, and no requested clasp type.
Each ambiguity means a phone call or email; each phone call means delay. Multiply that across the day and you’ve got backlogs you didn’t need.
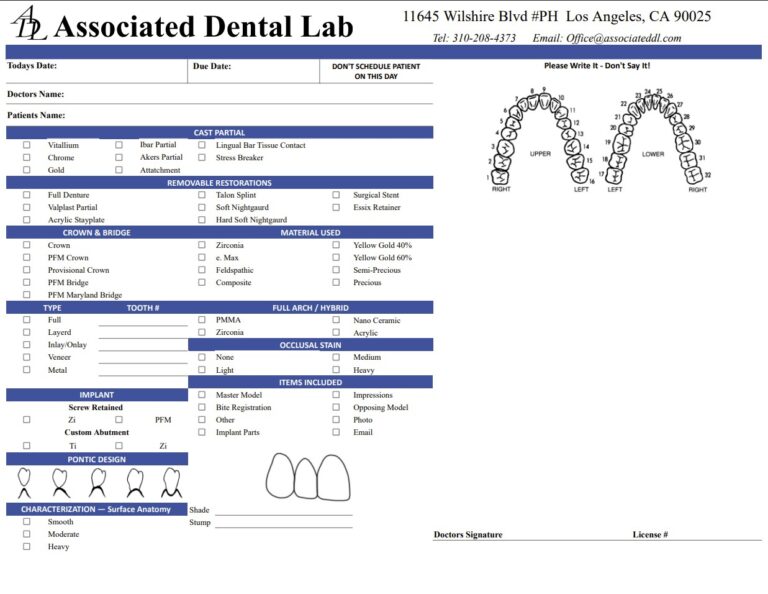
Anatomy of a High-Performance Dental Lab Rx Form
Must-have fields (and what “complete” looks like)
- Patient & case due date: Include the promised delivery date and the patient’s appointment date if booked.
- Restoration type & material: “Full-contour zirconia crown”
- Shade data: Vita shade, stump shade, photos with a tab, and any special characterization.
- Occlusion & opposing: Mark whether to copy provisionals, lighten centric, or avoid excursions.
- Prep, opposing, and bite sources: “IOS: Upper/Lower & buccal bite” or “PVS + bite + opposing model.”
- Contact goals: “Tight mesial/light distal” or “heavy proximal for orthodontic retention.”
- Implant specifics: Brand, platform, scan-body code, emergence profile notes, abutment preferences.
- Removable map: Tooth numbers, clasp types, undercuts, finish line requests, shade maps for gingiva/teeth.
- Communication channel: Who approves designs? Provide mobile/email and best times.
Tip: Keep a printable dental lab Rx template for crown & bridge, implants, and removables—each with the fields your team must fill every time. Consider calling it your dental work authorization form to remind staff that it’s a legal directive, not a sticky note.
Crown & Bridge “Do / Don’t” Gallery
DO: Specify material with a fallback
Do: “Primary: full-contour zirconia (translucent); if clearance <0.8 mm, use high-strength zirconia and reduce translucency.”
Don’t: “Zirconia pls.”
Why it speeds up: The lab doesn’t pause to ask what to do if they see tight occlusal space; they’ll follow your hierarchy.
DO: Define occlusion targets
Do: “Light centric, no contact in MIP if opposing is porcelain; avoid excursions on distal incline of #30.”
Don’t: “Adjust as needed.”
Why it speeds up: It prevents “too high” returns and reduces chairside grinding.
DO: Clarify margins and adjustments
Do: “Finish line: 360° chamfer; if indistinct, call before design.”
Don’t: No mention of finish line.
Why it speeds up: The lab knows whether to request a new scan or proceed.
DO: Label the files
Do: “SMITH_JANE_#19_ZircCrown_2025-09-12_Upper/Lower/Bite.”
Don’t: “scan.final.v3 (copy).”
Why it speeds up: Instant file triage prevents mix-ups.
Example: A clean crown & bridge lab slip line
“#9, monolithic e.max, HT A1 body with A2 cervical warmth; copy provisional length; light centric, no excursive contact; stump shade ND2; IOS U/L/BB attached; seat 9/28.”
Implant Lab Prescription “Do / Don’t” Gallery
DO: Over-communicate the system
Do: “Straumann BLX Ø4.0 RC, scan body = DME-STR-40RC, library in Trios 1.4; torque history 35 Ncm, re-torqued.”
Don’t: “Implant crown.”
Why it speeds up: Avoids emergency calls when libraries don’t match.
DO: Emergence & tissue notes
Do: “Emulate provisional emergence; maintain subgingival convexity; margin 0.5 mm supra.”
Don’t: Silence on profile.
Why it speeds up: Fewer pink-tissue blowouts and easier seating.
DO: Hybrid or ti-base details if relevant
Do: “Zirconia hybrid on ti-base”
Don’t: “Screw-retained plz.”
Why it speeds up: The lab follows your bonding protocol without clarification.
Example: A clean implant lab prescription block
“#12 screw-retained zirconia on ti-base; palatal access preferred; copy emergence from temp; shade A1 incisal, A2 cervical; torque 35 Ncm; deliver 10/5; Trios U/L + bite + photos attached.”
Removable Prosthetic Rx “Do / Don’t” Gallery
DO: Map undercuts and clasps
Do: “Kennedy Class III; path of insertion as surveyed; 0.25 mm MB undercut #6 for esthetic flexible clasp; circumferential clasp on #11; metal major connector.”
Don’t: “Please add clasps.”
Why it speeds up: Avoids redesign requests and chairside surprises.
DO: Finish line requests
Do: “Feather finish lines facial #7–10; relief at high frenum; polish to high gloss.”
Don’t: No border guidance.
Why it speeds up: Reduces sore spots and relines.
Example: A clear removable prosthetic Rx segment
“Max RPD: cast CoCr frame; flexible clasps on #6, #11; metal rests on #4, #13; A2 teeth, light-pink gingiva; path of insertion per survey; deliver 10/10; photos + undercut map attached.”
How to Fill a Dental Lab Prescription (Step-by-Step)
1) Decide material & constraints first
Write the restoration + Plan B when space or color demands change. If you’re unsure, ask the lab for a quick recommendation before finalizing the dental work authorization form.
2) Build the shade package
- Vita shade + stump shade
- 2–3 retracted photos with shade tab flush to the incisal edge
- Any special characterizations or surface texture notes
3) Attach the right records
- Fixed: prep, opposing, bite; for copies, include provisional scans/photos
- Implants: correct scan-body, opposing, bite, soft-tissue scan; platform brand/size
- Removable: undercut map or survey lines, path of insertion, bite, photos of high frena
4) State occlusion rules in one line
“Light centric; no excursive contact; broaden contacts mesial-distal.”
5) Add logistics
Due date, patient appointment, rush or standard, and who approves the design.
6) Double-check consistency
Shade on Rx matches photos; material on Rx matches narrative; due date is realistic.
The Rx “Do / Don’t” Gallery by Category
Shade & Photography
Do
- Use neutral lighting, retractors, and a gray card when possible.
- Hold the tab edge-to-edge with the tooth, not floating in the foreground.
- Include a stump shade for translucent ceramics.
Don’t
- Send only a selfie or a phone snap with a blue light filter.
- Change shade mid-case without telling the lab.
Scans, Models, and Bites
Do
- Scan dry fields; do a slow 360° around margins; verify for holes.
- For IOS bites, confirm tripodization and clean occlusal surfaces.
- Label files with tooth numbers and dates.
Don’t
- Upload “Upper only” for a single crown and hope articulation is right.
- Send models without opposing or a bite.
Implant Specifics
Do
- Write platform, brand, and the exact scan-body code.
- Note if you want custom abutment vs ti-base hybrid, screw-retained vs cement.
- Include any tissue sculpting goals (copy temp, emergence shape).
Don’t
- Assume the lab can guess your implant system from the radiograph.
- Leave torque specs or verification plans unspecified.
Removables
Do
- Provide a clasp plan, undercut depths, and finish line preferences.
- Choose gingival/teeth shades and any characterization.
- If using flexible components, state exactly where (e.g., esthetic clasps only).
Don’t
- Request “do what you think looks best” and expect zero adjustments.
- Send only alginates without a stable bite or path guidance.
Real Examples: From Sluggish to Swift
Example 1: Posterior zirconia crown
Slow Rx: “#30 zirconia, shade A2. Thx.”
Swift Rx: “#30 full-contour zirconia; A2 body, A1 incisal; light centric, no excursive contact; IOS U/L/BB attached; deliver 9/30; approve designs via Dr. Park (cell).”
Why it’s faster: Material + shade nuance + occlusion + records + approver + date—no follow-up needed.
Example 2: Anterior e.max with translucency
Slow Rx: “#8 e.max, make it natural.”
Swift Rx: “#8 e.max LT; A1 body, fine incisal halo; copy provisional length 10.5 mm; stump shade ND2; two photos with tab; IO scans U/L/BB; finish slight texture vertical; deliver 10/1.”
Why it’s faster: Texture, length, stump shade, and photographic references remove the guesswork.
Example 3: Single implant crown with ti-base
Slow Rx: “Implant crown #19.”
Swift Rx: “#19 screw-retained zirconia on ti-base; Straumann BLT RC 4.1; scan-body: DME-STR-RC; copy provisional emergence; palatal access; torque 35 Ncm; IOS U/L/BB + photos; deliver 10/4.”
Why it’s faster: Complete implant metadata + emergence + access preference.
Example 4: Maxillary RPD with esthetic clasps
Slow Rx: “Upper partial, add clasps.”
Swift Rx: “Max RPD; Kennedy III; CoCr frame with rests on #4/#13; flexible esthetic clasp on #6 & #11 (0.25 mm MB undercuts); path per survey; A2 teeth; light-pink gingiva; feather finish lines facial #7–10; deliver 10/8.”
Why it’s faster: The design is essentially done on the Rx.
A One-Page Rx Checklist Your Team Can Print
- Case type (fixed / implant / removable)
- Material + fallback plan
- Shade + stump shade + photos with tab
- Occlusion targets (centric/excursive)
- Records attached (prep/opposing/bite; scan-body + soft tissue for implants)
- Implant metadata (brand/platform/scan-body/torque)
- Removable specifics (clasp map, undercuts, finish lines, shades)
- Due date + patient appointment + rush?
- Approver contact (email/mobile)
- Notes to lab (copy provisionals, characterization requests)
- Confirm consistency (Rx ↔ photos ↔ scans)
Where to get a lab slip: Associated Dental Lab’s Send a Case page links to a downloadable lab slip, plus options for local pickup and prepaid shipping if you’re outside courier range. All work is Made in Los Angeles under strict QC. Their FAQ and blog also highlight full-service support across fixed, removable, and implants, which can inform your Rx terminology.
Lab Case Communication: Small Habits, Big Speed
- Name one approver per case; labs lose days trying to track the right person.
- Reply in-thread and keep subject lines intact so design notes aren’t orphaned.
- Bundle changes; don’t drip-feed updates (“shorten 0.3 mm” followed by “actually 0.5 mm”).
- Use the portal or preferred email so messages attach to the case ID.
- Tell the lab if the appointment moved; they’ll re-slot CAM and glazing to match.
Frequently Asked Questions (FAQ)
1) What’s the fastest way to complete a dental lab prescription?
Use a role-based checklist: material + shade package + occlusion + records + due date + approver. If the case is implant-based, add platform and scan-body codes. For removables, add clasp maps and finish lines. If your office needs a printable dental lab Rx, store your template by category (fixed/implant/removable) and keep it at the front desk.
2) Where can I get a dental lab Rx form for Associated Dental Lab?
Go to the Send a Case page to download the lab slip and select local pickup or prepaid shipping. Everything is fabricated in their Los Angeles lab.
3) How do I fill an implant lab prescription without delays?
List the implant brand, platform, and the exact scan-body/library; state screw-retained vs cement-retained; specify emergence (copy temp or design notes); and attach U/L scans, a buccal bite, and photos. That’s the core of how to fill a dental lab prescription for implants.
4) What belongs on a crown & bridge lab slip besides shade?
Material and fallback plan, occlusion targets (“light centric/no excursions”), stump shade, photos with tab, and whether to copy provisionals. Include prep/opposing/bite—and the due date.
5) What should I include on a removable prosthetic Rx?
Kennedy classification, path of insertion/undercut map, clasp types and locations, finish line/relief instructions, tooth/gingival shades, and a bite record. For esthetic demands, add photos of smile and frena.
6) Do I need a separate dental work authorization form for each case?
Yes. Treat the Rx like a signed work authorization: it instructs the lab and protects both parties. Use the lab’s standard slip for traceability and compliance; Associated Dental Lab offers a downloadable lab slip.
7) How can I improve lab case communication when we’re busy?
Assign a single approver per case, reply in the existing thread, and batch changes once per day. Include your patient appointment date so the lab schedules CAM and glazing appropriately. Associated Dental Lab’s site lists contact details and central channels if you need quick help.
Conclusion
Great dentistry slows down when the Rx is unclear. A precise dental lab prescription is the cheapest, fastest productivity lever you control. Spell out material and a fallback, send a complete shade story, state occlusion targets, attach the right records, and add implant or removable specifics that anticipate lab questions. Do that consistently and your cases speed up—design approvals get shorter, seats get easier, and your schedule breathes again.
About Associated Dental Lab
Associated Dental Lab is a dentists’ trusted Full-Service Dental Lab in Los Angeles—Crafting Smiles since 1962. They make case submission simple with a downloadable dental lab Rx form, local pickup, and prepaid shipping options, and they fabricate all restorations in-house for quality and consistency. If you want help tuning your Rx process—or need a fast start on your next case—reach out to their team and send a case today.
Quick links: Download the lab slip and submit through the Send a Case page; check their FAQ/blog for service details across crown & bridge, implants, and removables.